
Welcome to the Soc Analyst Home lab!
In today’s interconnected digital landscape, the importance of a Security Operations Center (SOC) cannot be overstated. SOC teams play a critical role in safeguarding organizations against cyber threats, detecting and responding to incidents, and ensuring the integrity of digital assets.
In this practical and hands-on approach to gaining valuable experience using Kali Purple! Kali Linux has always been known for their offensive security the Kali Linux Team came out with a new project in 2023 named ‘Kali Purple,’ designed for defensive security. Whether you’re a seasoned cybersecurity professional looking to sharpen your skills or a budding enthusiast eager to explore the intricacies of SOC operations, this blog is for you.
For this lab, I will be using:
VMware – VM
Kali Linux – Attacker Machine
OPNsense- Firewall
Suricata- IDS/IPS
Security Onion –
Windows 11/Windows 2019 server- victim machine
Security Onion –
Splunk – SIEM
Let’s start off with the diagram!

VM installation
First, we have to download Virtual Box or VMware.
This video will show you how to download Virtualbox and Kali Linux!
Watch this video on how to download VMware.
OPNsense Firewall Installation
Now I am going to Install and Configure OPNsense
To install Pfsense you can go to the OPNsense website
Here you click Amd64, image type DVD.
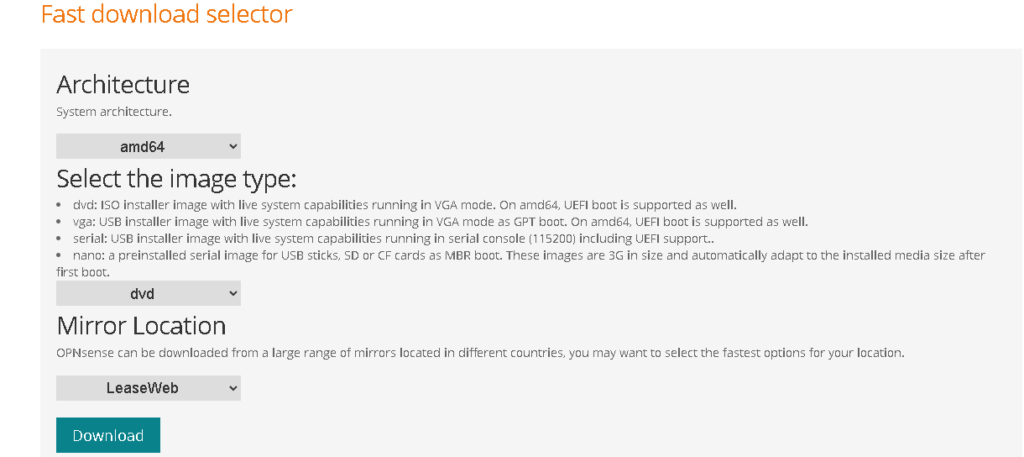
Once you have downloaded Pfsense you can use software like 7zip to extract it.
Now set up in a Virtual environment in either Virtual Box or VMware. Personally, I am going to use Virtualbox. From there add the OPNsense iso file to the machine and run it.
Once you finish setting it up and installing you should in the main menu1
From here I am going to assign interfaces. LAN >em1, WAN >em0 so the WAN can get an IP address from the DHCP server.
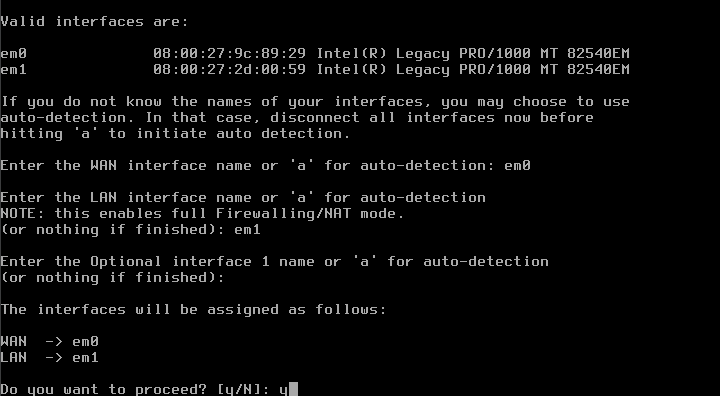
I assigned the LAN IP Address to 198.168.1.5

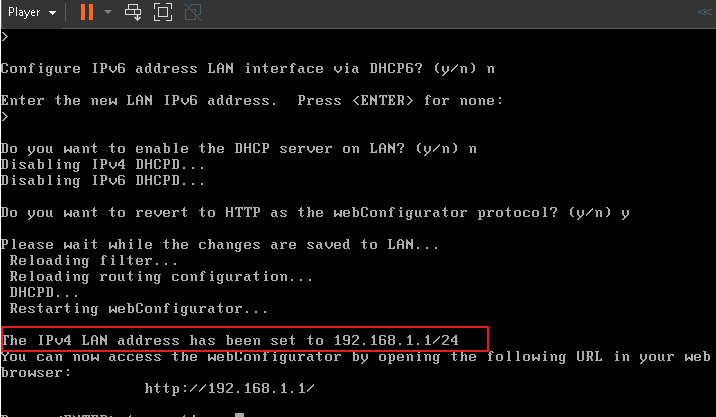
In order to change the IP address of the web configurator you need to change the IP address of your LAN to the one you want. Once you change it, it will be the default IP address for the web configurator.
That’s it for the firewall for now.
Let’s download Kali Linux
Once you download the iso file go to Vmware and run it.
Once you set it up to make a static IP to talk to the firewall
Use this video to learn how to do it.
This is what I have

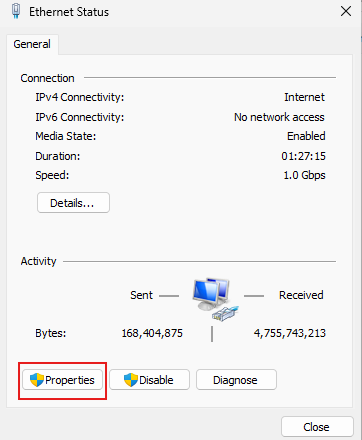
To make sure that it can talk to the firewall try pinging it first

If it receives a reply this is a good sign.
Type in the LAN IP address to the browser and it should give you a login page. Enter the username and password that you have during the setup in my case is username is root and the password is root123
Once you login in you should be able to see this dashboard.

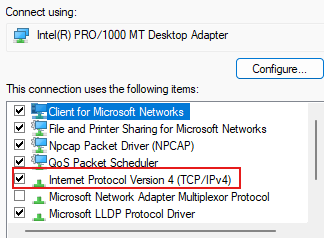
Let’s install the Suricata IDS/IPS solution on OPNsense.
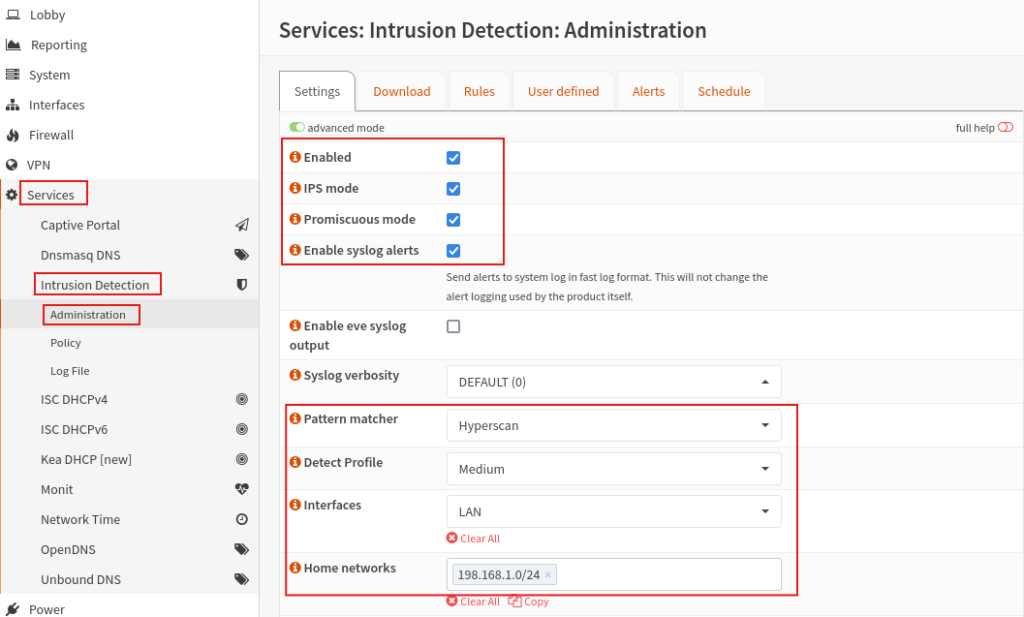
To enable the IDS, we go to Services > Intrusion Detection > Administration
Then click on advanced mode and enable the IDS, IPS mode, Promiscuous mode, and enable alerts.
Then put the pattern matcher to Hyperscan, Detect profile to medium, Interfaces to LAN, and then for Home network add your LAN subnet. Click Save.
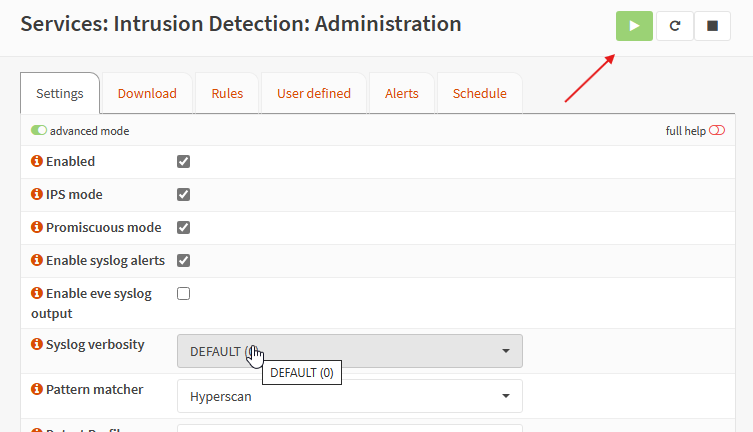
Here you can see we can enable the service by pressing the play button.
All we did is enable the IDS/IPS system but you still need to add the rules.
We are going to be adding a next-gen firewall to Pfsense using Zenarmor later
Now let’s download Security Onion and download the iso file.

Once you add the iso file it will automatically detect the oracle linux server. Click next then name the machine.

Specify disk size (minimum 200GB), store as a single file, and click Next.

Click “Customize Hardware” and do the following:
Change memory to 4-32GB
Add two Network Adapters and assign them Vmnet 4 & Vmnet 5 respectively

Click “Finish”
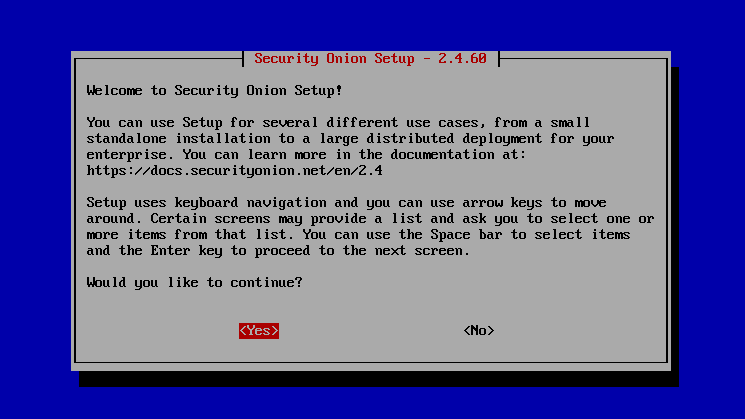
Power the virtual machine and click Enter when prompted:

After the initial stages of loading, type “yes” when prompted

Set a username & password:
After Security Onion Reboots, proceed with the following:
Enter the username & password

Select “Yes”
Click Enter

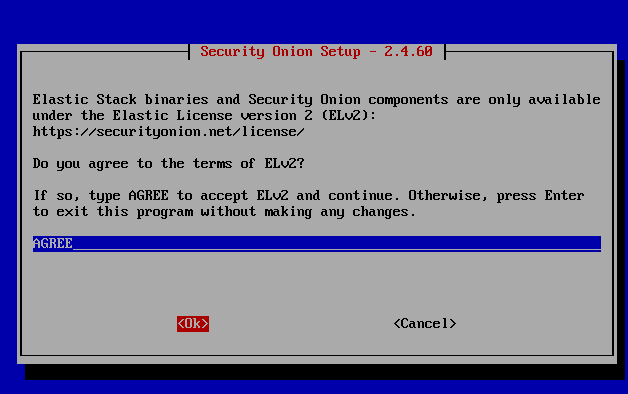
Select the EVAL option

Type “AGREE”
Select “Standard”

Set a hostname
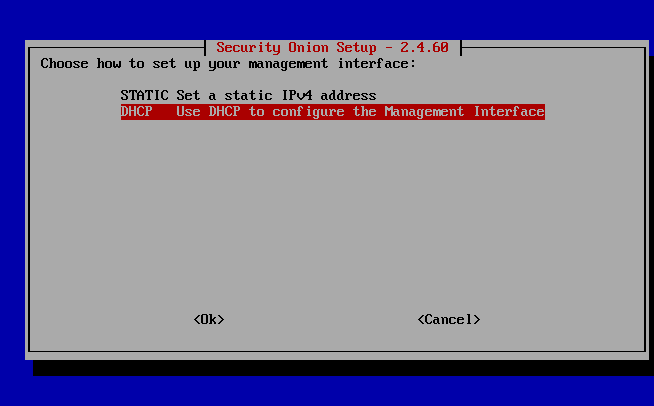
Click the spacebar to select ens160 as the management interface
Set the addressing to DHCP:
Select “YES” at the next prompt
Select “Direct” for the next prompt

Select Yes.

Click ens192

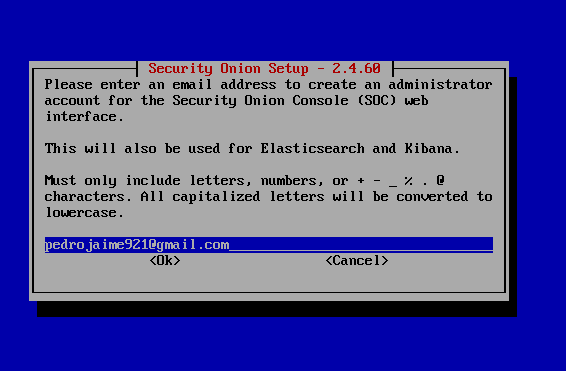
Enter an email address and password for the admin account
Select “IP”

Select “Yes” for the NTP server & accept the defaults
Take note of your final settings before proceeding! If possible take a screenshot.
Most important detail is the IP address for web access.
Select “Yes”

SecOnionMgmt/ Analyst Machine
After installing Security Onion, having access to the web interface will be done from an external Ubuntu Desktop simulating a SOC/Security Analyst accessing a SIEM or any other tool from their device.
To do this, you’ll first have to configure an Ubuntu Desktop. This is a very easy process and I’ll not be covering it in this write-up but it is covered in the video. Be sure to use all the default settings for the Ubuntu Desktop configuration.
After this installation, run the ifconfig command on the Ubuntu Machine and take note of its IP Address.
Head back to your Security Onion instance and run the following command
sudo so-allow
Enter your password
Type a and wait for the process to complete

Type in the IP Address from the Ubuntu Desktop
This will create a firewall rule on Security Onion that will allow you web access from your Ubuntu Desktop
Navigate to the Security Onion IP Address on your Ubuntu Desktop:

This ends the configuration of the Security Onion VM.
Installing and Configuring Windows Server 2022.
Power on the Virtual Machine and immediately click any key.
Click Next
Click Install Now

Select the Windows Server 2019 standard Evaluation (Desktop Experience)
Accept the License Terms
Click Next
Select the Custom Install

You should have this screen now

When that is complete, create a password

After the installation and login, it should automatically pull up the Server Manager

On the Server Manager Dashboard, Click Manage >> Add Roles and Features

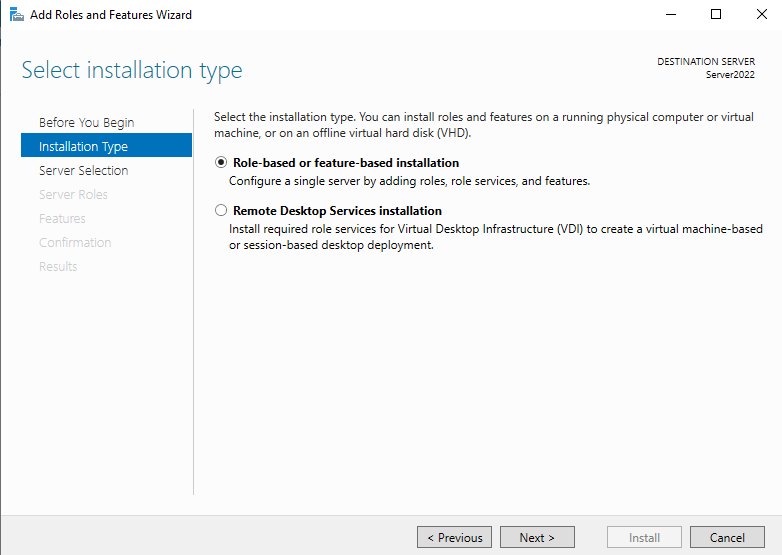
Keep clicking Next till you get to the Server Roles menu
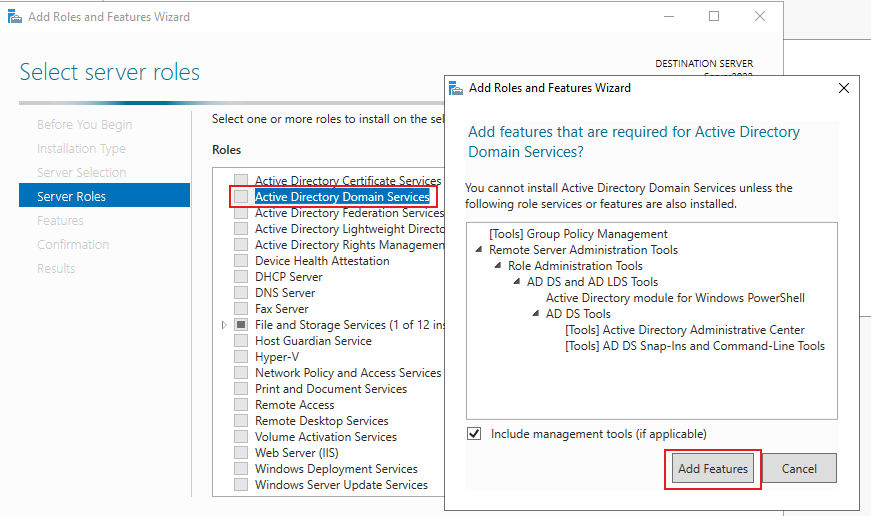
Select Active Directory Domain Services
Select “Add Features“
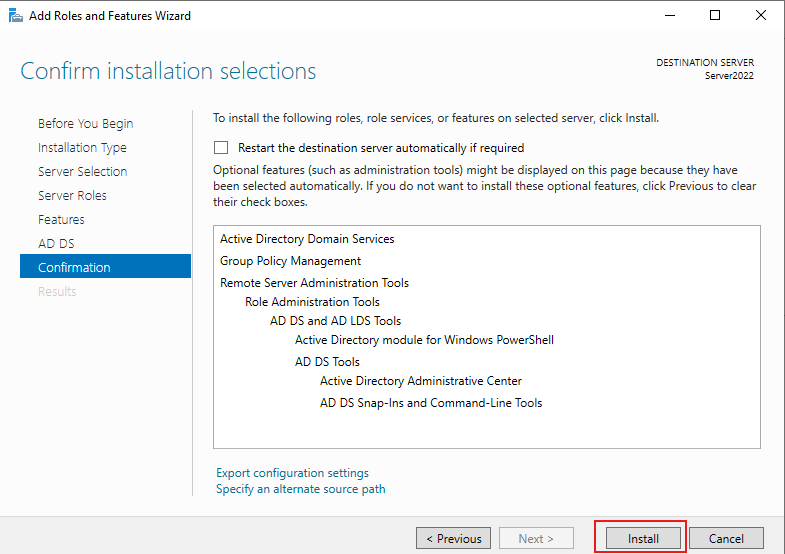
Click on Next till you get to the Confirmation menu, then click Install
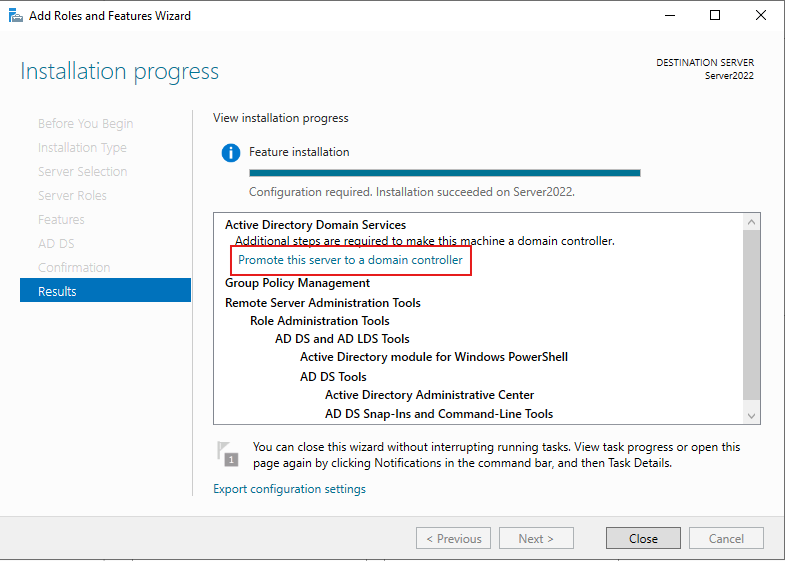
Select “Promote this server to a domain controller“
Select Add a new forest and Specify a domain name
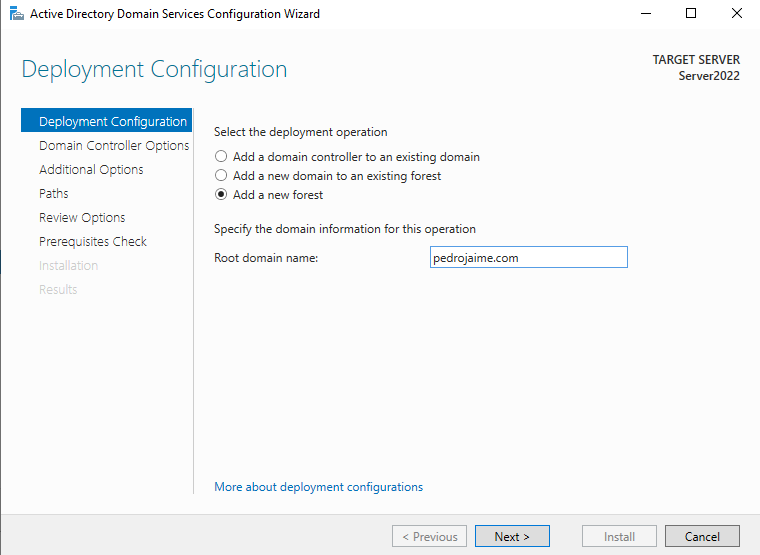
* Click Next
* Set a Password
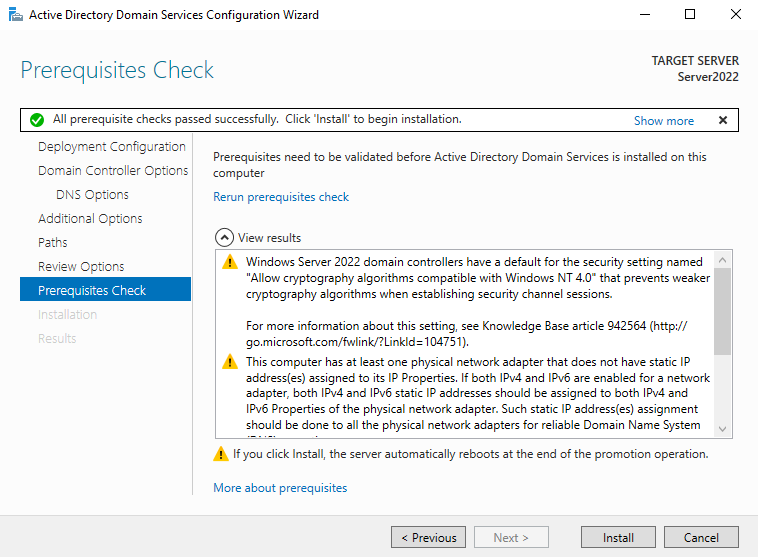
Click Next till you get to the Prerequisites Check Menu
Click Install
After it finishes installing, it will Reboot
After the Reboot, Log back in
Select Manage >> Add Roles & Features again on the Server Manager
Click Next till you get to Server Roles

Let’s add some users.
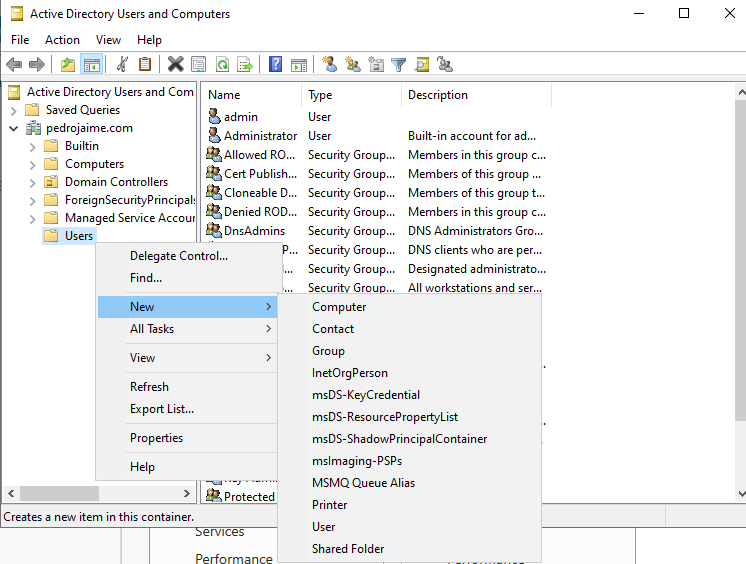
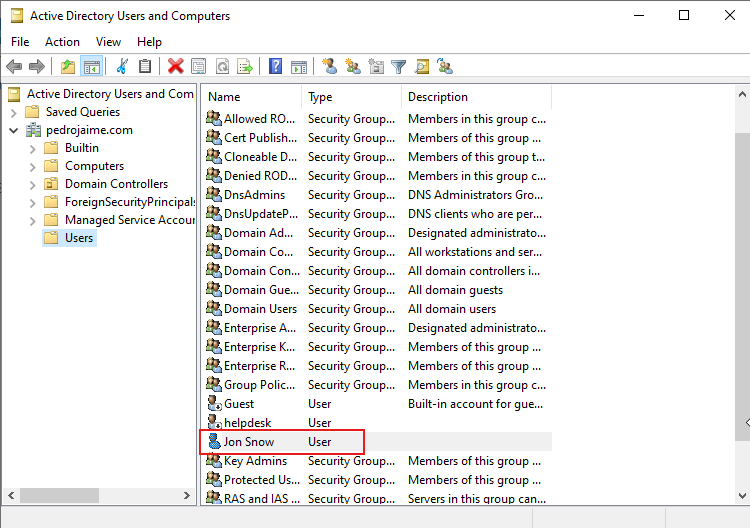
In the Server Manager Select Tools > Active Directory Users and Computers

Select your Domain Name (pedrojaime.com) > Users, Right Click & Select New > User
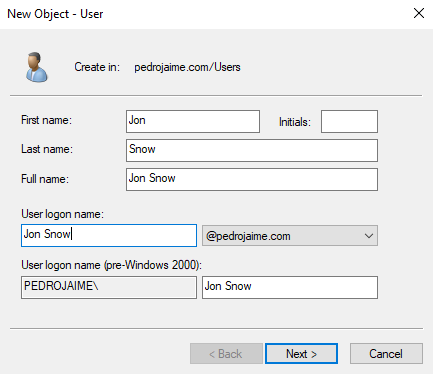
Enter the First and last name & User login name for the user.
Set a password that never expires. Select Finish.
The user Jon Snow should appear here.
Now we have to disable the firewall to analyze all types of vulnerabilities.
Search for “Windows Defender Firewall” > Turn Windows Defender Firewall on or off.
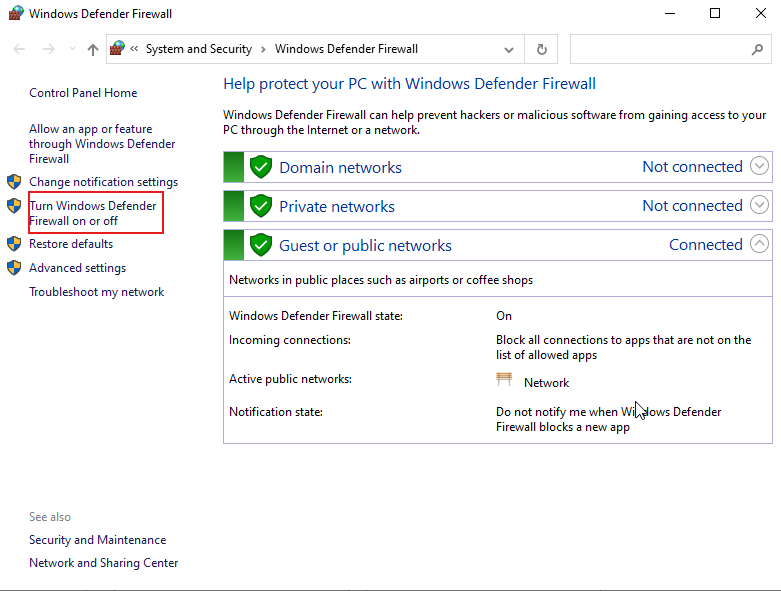
Turn off the firewall for all Networks

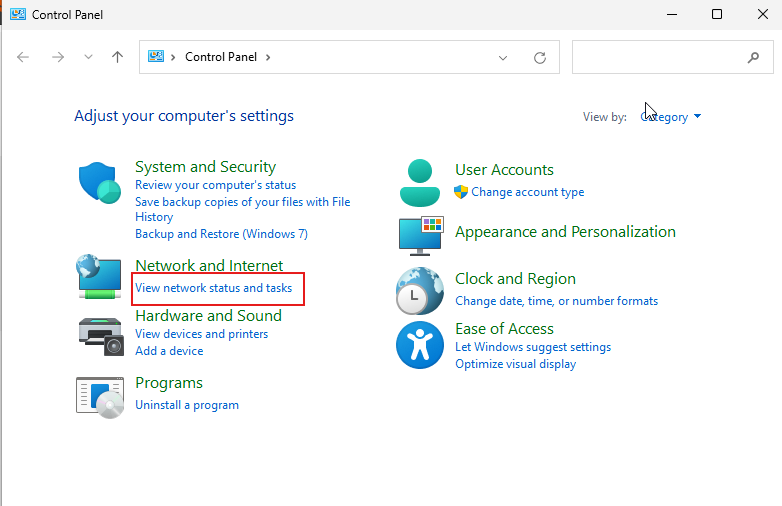
Now Use OPNsense as the default gateway for the Domain Controller
~ Navigate to Control Panel > Network and Internet > Network Connections
~ Enter the following configuration

Configuring Windows 11 Desktop & Adding a User to the AD Domain
The goal of this portion of the lab is to add 2 Windows 10 desktops to the Domain and complete the active directory lab. This portion of the lab is very easy to set up.
Install in Virtualbox as usual with defaults
* Do not worry about a product key, simply click Next
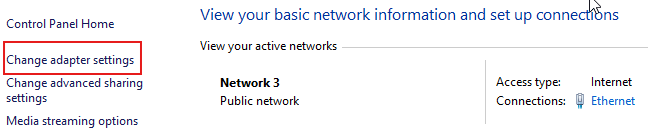
Go to Control Panel and click View network status and tasks
Navigate to Change Network Adapter settings
~ Right-click on Ethernet0 and select properties

Go to Properties
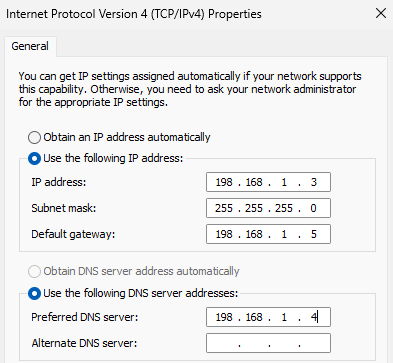
Select IPV4
Add an IP Address(198.168.1.3) & Use 192.168.1.5 as the default gateway
Make sure that the DNS server is the IP address of the Domain controller/Server 2022
or else you won’t be able to contact it (198.168.1.4).
Join PC to pedrojaime.com Domain
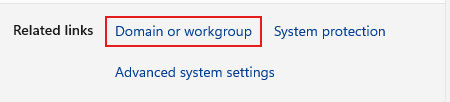
First, go to the File Explorer, right-click on This PC, then click Properties.
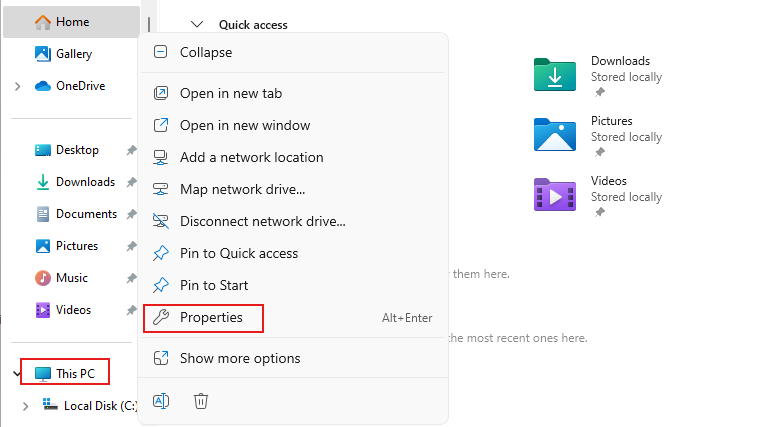
Then click Domain or Workgroup.
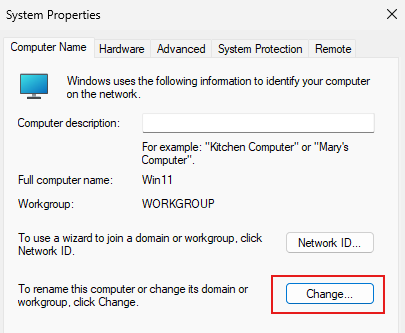
Click Change
Type the domain you want to join and click OK.
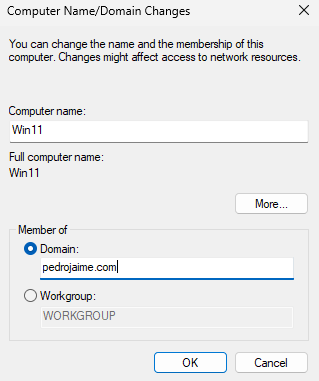
Put in your username and password
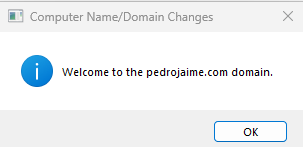
Now restart the PC
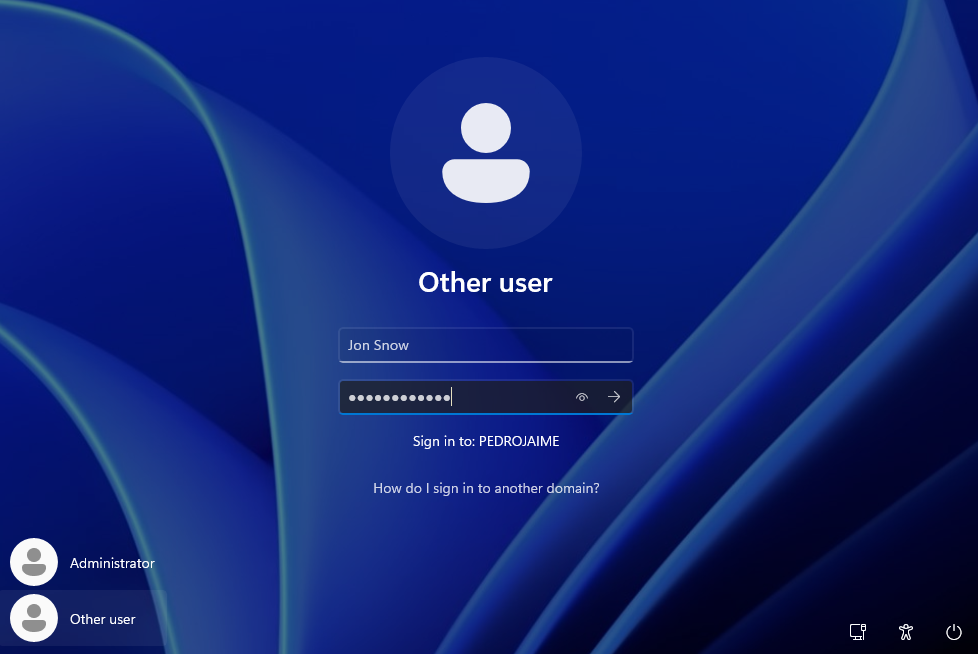
Lets see if we can sign in using the Jon Snow user that we created in the server now that we have join the Domain.
Installing Splunk
I am going to use the Ubuntu server for the Splunk Instance.
You can download the server here.
Now create a new virtual machine for the Ubuntu server and add the ISO file, then run the machine
Choose language

Keyboard layout
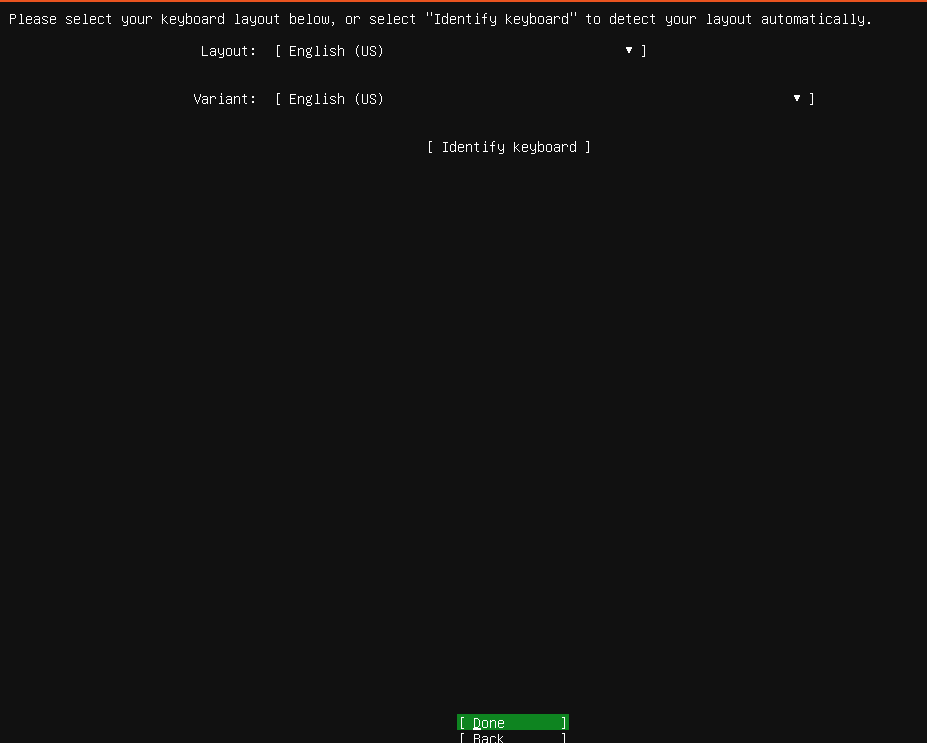
Keep clicking Done until you get to this screen.
Click Continue

Fill in your information

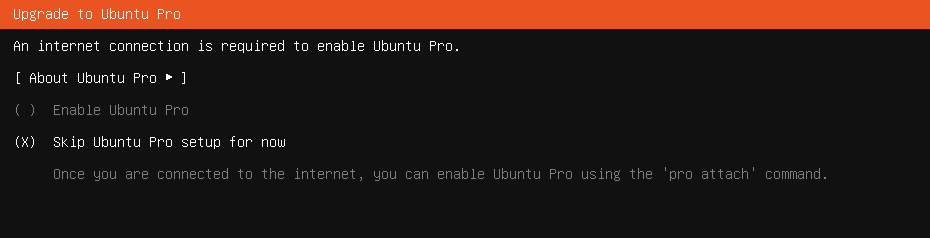
Skip
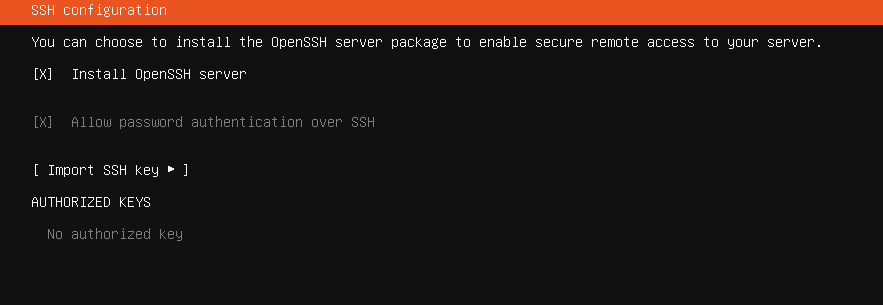
Mark an X on OpenSSH and click Done
Now it should start installing.

Once it is complete click Reboot

Once it has rebooted, it will prompt you with the credentials that you created earlier.
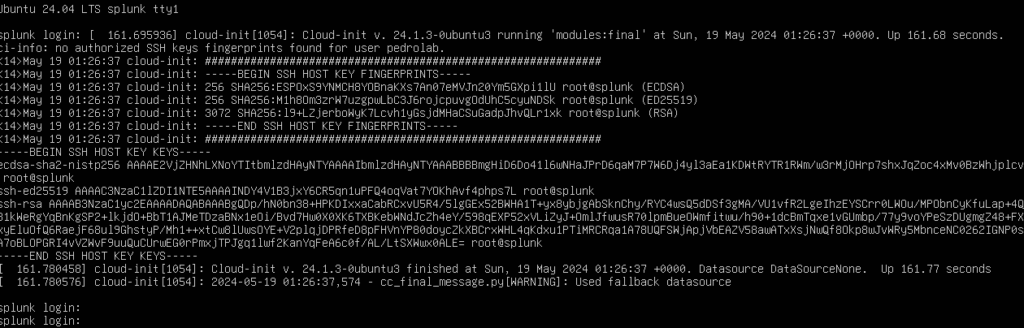
Once you log in you should see this on your screen.

Now type in this command sudo apt install tasksel to install multiple packages on the server and enter your password. Then type “y” for yes and it will start downloading.

Now run this command sudo apt install ubuntu-desktop and enter the password. (This installation will take a while so sit tight.)

Once it is finished downloading reboot the machine by typing reboot.
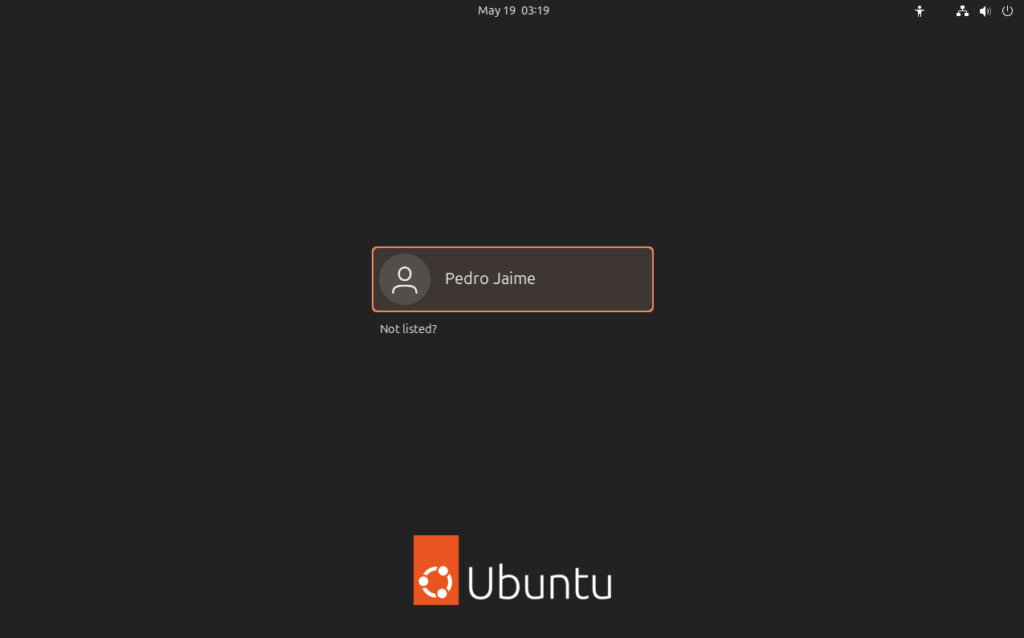
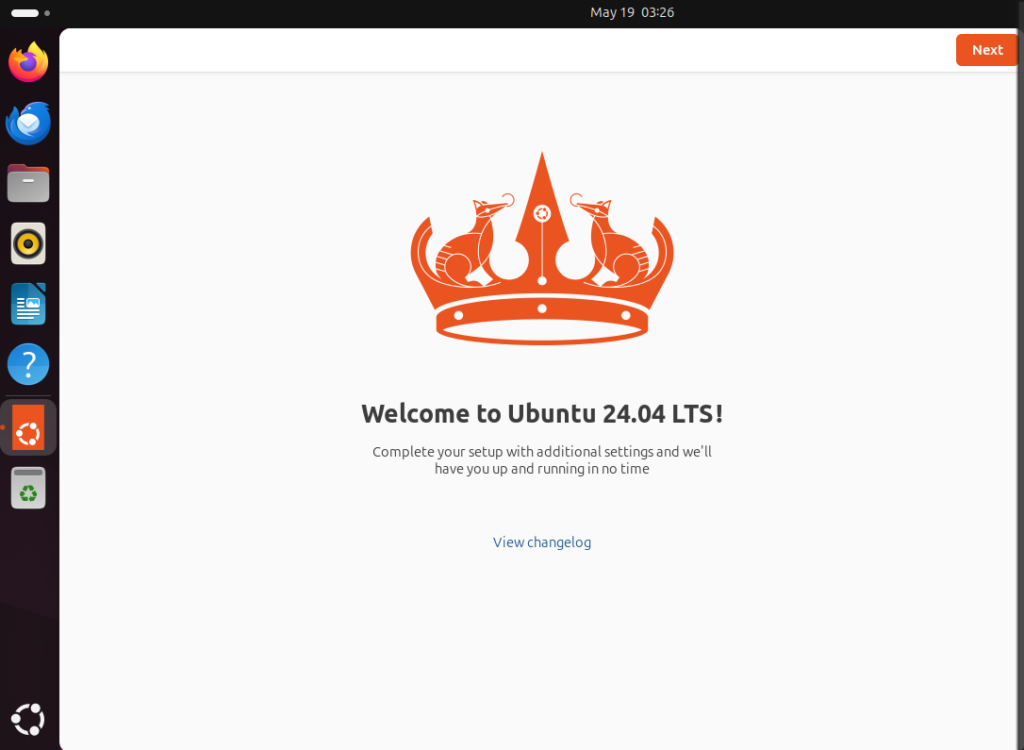
After rebooting you should see this and be able to log in.
NOTE: I will keep updating this lab with time.
Leave a Reply